Money, Time, and Backups

It is a feature of getting older.  When you are young you have all the time in the world, but no money.  As you get older, if you have done OK, you have enough money to satisfy most needs – but not enough time.  Money can be renewed.  Time cannot.  I have become very obsessive about my use of time.

If I go somewhere where I assume I will be waiting, I always bring a book.  Even though I may only get through 2-3 pages, I still will finish a book in a few weeks.  I feel like I have gotten something for nothing.  I have not wasted time.

I hate doing things twice.  I know the second time is nothing but a pure waste of time.  This is why I like backups.  With backups, if I lose something, I have a good chance of recovering most of it.  I will waste as little time as possible.  On my computers at home my primary disk copies off to three separate backup disks.  Much of  what I have can’t be replaced (pictures).  If I invested all that time into getting it  in it then it is certainly worth a couple hundred dollars to improve my chances of saving it.

I switch my ‘primary’ computer about every 18-24 months.  Linux makes this easy.  All my storage files are in a specific directory.  I can just copy my “home” directory to the new computer and be up and working quickly.  With a new computer I spend most of my time improving my backups with what I have learned.  This is time well invested.  It pays dividends by giving me time back in the future in the event of a problem.

My reason for mentioning this is because of another post I was writing earlier.  I usually don’t write in wordpress.  I write in a text editor because it is easier.  I then copy/paste it into wordpress.  I was on a windows machine at the time.  When I was done I wanted to print it out and read it.  I hit print.  The printer program hung.  My program crashed.  I lost everything.  I hadn’t hit save as I was working.  It was a stupid and careless mistake.

Posts are much easier to write the first time.  There is a sense of excitement as you write it out.  That fades as you make corrections to it.  You become tired with what you have written.  I’ve heard it said that books aren’t completed – they are merely abandoned.  I believe that.

I read about Rossini once.  He was so talented as a composer he was writing in bed when the score slipped to the ground and under the bed.  Rather than get up he started a new one.  I’m not that good.  I will have to rewrite my post.  It won’t be as much fun.  Time is lost. It will bother me all night.

Don’t make the same mistake.  Save your work and do backups.  It is good insurance and the time lost can’t be replaced.

Scanned Photos in Picasa – Use This Tool!

While Picasa is a wonderful tool – it does have one flaw.  It sorts pictures by the date in their exif header.  If you keep the date on the camera correct, this isn’t a problem.

However – I have two sets of pictures that give me problems.  I have been scanning my old 35mm film at home for a couple years in my spare time.  I have also sent away some APS film that I wanted to have scanned before it became totally obsolete.  When these pictures are scanned, the date in the exif header is the date that the film was scanned. (The scanner creates the exif header)

Even if I file them in folders for a particular date – I still have scanned photos from the 1980’s showing up in 2009 under picasa.

To fix this you have to modify the date in the exif header.  The best tool I have found to do this is jhead.  Luckily – jhead works on windows, mac, and linux.  Now to set the dates for a whole series of pictures in a particular directory I can just do this:

jhead -ds2000:12:25 * (set the exif dat to Christmas 2000)

You can even set the filestamp to the date in the exif header with

jhead -ft *

This may not seem like much – but it might be the only tool I’ve found that can do this.

If your image doesn’t have any exif data – you can even create the header:

jhead -mkexif *

Now these pictures will show up in the correct chronological order in Picasa – and finding the ones I want is much easier.  I suggest you check out the documentation page for all the options available.  But I have found this to be one of the critical tools in my Linux Photographer Toolbox.  And all you lucky PC/Mac users get to use it too 🙂

Managing Photo Libraries in Linux – A Simple Method.

I use my Linux machine as my primary machine for photography.  I import my pictures with a card reader, edit them as needed with GIMP, and then file them.  For backups I created a simple shell program with rsync which backs them up nightly to another disk.

I take about 1500-2000 pictures every year.  I only delete the absolute mistakes.  Right now I have about 12,000 pictures on my system.

I have been though several programs to manage my pictures.  On my mac I tried Iview Mediapro – which was then bought by Microsoft (and recently abandoned once again.)  I must admit – having used computers at home since 1987 I’m not too willing to surrender myself to a single program.  I’m sure that every year since I have owned a computer I have had to worry about migrating my data either because of the operating system, the computer, or the program.  This has influenced how I manage pictures today.

I use a simple directory structure to store my pictures.  For example – suppose I take Easter pictures on April 20th of 2010.  I will put all those pictures in a folder that describes them: “Easter_at_Bunny_House”.  Then that folder will be put into my overall picture directory – and will look something like this:

/storage/primary/photos/dated/year_2010/d_Apr/Easter_atBunny_House

  • /storage is my storage folder at the root level
  • /storage/primary is a dedicated disk mounted at that point (I actually have a /storage/backup as well)
  • /storage/primary/photos – I store other stuff
  • /storage/primary/photos/dated – I have other photos which might be categorized (a clip art collection perhaps).  I also have others where I don’t know the correct dates yet (collections from relatives.)  Although I try to get everything into the ‘dated’ directory – there are other spots for some photos.
  • /storage/primary/photos/dated/year_2010 – Each year has it’s own folder, and within each year are 12 months (I copied a few years into the future so I wouldn’t have to do the months by hand)
  • /storage/primary/photos/dated/year_2010/d_Apr – I have the months listed alphabetically – so you will see “a-jan, b-feb, c-mar” and so on – just to keep them in order.

Why I don’t use IPTCIPTC is a great standard.  Unfortunately, many of the popular programs don’t use IPTC. Iphoto didn’t before.  I don’t know if they do now.    Here is a list of programs that work with IPTC.   The problem is simple.  Adding keywords to programs is a lot of work!

I find that by naming the folders correctly I can often find the pictures just through memory or a simple search.  This works a majority of the time.  When it doesn’t, I use Picassa for Linux.   I poiint this to my photo directory and can scan my photos quickly to find the one I want.

I have about 12,000 photos.  I am not dependent on a particular program.  I can move my files easily to another system.  If you have fewer photos a photo program might work for you (although good luck migrating in the future.)  If you have many more pictures a professional implementation might be worth your time.  For me – the simple method seems to work best and I am quite happy with it.

Is a UV filter a good idea for your lenses?

I was on the fence before.  I’m not anymore.  Over Memorial Day weekend we went to an amusement park. Although I have a camera backpack – I rarely use it.  It provides great protection but it is cumbersome.  I can’t carry anything else (water or snacks) in the same pack.  And it SCREAMS Photographer – when I am often just trying to enjoy myself.  So normally I just put my camera in a backpack and wrap it in a spare t-shirt.   I was taking pictures of one of those log rides and I looked at my lens to see if it was wet.  This is what I saw:

My UV Lens

Luckily this is not an expensive UV Filter – only about $20 if I remember correctly.  I prefer to have my in-expensive UV filter cracked, rather than my $750 Expensive Lens. Another note – this occurred with the lens cap on.  Here is a closer look:

Closer look at crack

I suppose someone could learn another lesson from this – use the camera bag.  But I not going to do that.  For now I am going to keep these nice cheap UV filters on all my lenses.

Using my Canon FS20 with Linux

Before I start – let me say that this is not a post about editing the video of the Canon FS20 in Linux.  I haven’s set up my machine to do that yet (I shuttle the video over to a Mac for editing right now).  This is just a simple explanation about how to get the video off the camcorder, on your computer, and uploaded to Youtube.  I’m doing this on Ubuntu 8.04 – I can’t vouch for other systems.

Canon FS20 Video Camera

1) Plug in the camcorder power supply (the camcorder will not just connect on just battery power.)

2) Plug in a USB cable connected to the computer and to the camcorder.

3) Turn the camcorder on.

4) Press the button on the bottom right of the screen (has a ‘movie camera’ and a ‘play symbol’)

5) Use the little toggle switch to select “PC/PRINTER

6) Press the toggle switch down to select it.

7) You should now have a folder named “CANON” on your screen.  Open it.  Select SD_Video folder, and then the PRG001 folder.

8.) In the folder you will find “.MOD“, “.MOI“, and “.PGI” files.  The “.MOD” files are our mpeg movies.  Copy these files to the Desktop so you can work with them.   Select one of those files and rename it (in my example) from “MOV001.MOD” to “newcuriousthoughts_example.mpg” (or whatever you want to name it – the important part is the ‘mpg’ extension)

9) Once you have the file off the camcorder, you can unmount the camcorder by right-clicking the “CANON” folder and choosing “un-mount“.  You can now disconnect the USB.

10)  Now you can play the file or upload it to Youtube…  almost.  Unfortunately – this is what it looks like when I upload it to youtube:

11)  To fix this “squished” look I figured out a ffmpeg string to convert it to an mp4 and maintain the aspect ratio.  For my video it would be:

ffmpeg -i newcuriousthoughts_example.mpg -aspect 16:9 -b 9600kb -r 29.97 -ab 256k newcuriousthoughts_corrected.mp4

Note:  I like this Reference for ffmpeg.  I think I chose these parameters to keep the size as close as possible.  For my example – the video size is 5.1 Meg – after conversion it is 5.4 Meg.  I’m sure you could tweak this if you like.  Sometimes I will add the “-deinterlace” option – which works pretty well.

Here is now the video looks after the conversion:

The video will look better than this on youtube.  WordPress just limits the size of my youtube object – that is why it looks shrunk.  Hopefully this will help some of you in the future!  Someday I’ll start editing these files – but I haven’t tried it yet.

Phatch – Linux Photo Batch Resizing

In a previous post I mentioned KRename.  It really is my favorite tool for renaming photos once I get them onto my computer from the camera.  I use it the most. But occasionally I need to resize my photos, or I want to resave them to a lower resolution, or a more compressed jpeg.  I often do this when I want to email several photos to people or I want to resize them for this blog (and not use all my allocated memory.)

For these tasks I like to use Phatch. I have it in my Ubuntu 8.04 repository.  If it isn’t in yours you can find the download here for Linux (and Windows and Mac).  Phatch is a neat little tool written in Python that allows you to shrink your photos, apply text, or watermarks, round the edges of photos – then save them with a chosen name.  Like KRename – I’ve never had it destroy a set of my photos (always very important.)  I’ll admit I find the interface a little weird – but it tries it’s best to be intuitive – and I can usually work my way through without much trouble even if I haven’t used it for a couple months.

Here is a very simple example of what Phatch can do:

When you open the program you get the working window:

Phatch Opens with the Action List Window

You then click the “+” key to get a list of possible actions for your photos from which you can choose:

A List of Actions to choose from...

There are MANY more actions than this available. You can read about all of them in the Phatch Wiki.  I usually am simply resizing my photos.  Once you choose an action you are given a variety of options:

Each action has various options from which to choose.

Whatever actions you choose – you need to remember the make the last action the SAVE action.  Here is where I adjust the JPEG quality of my original photos.

Working with SAVE. A variety of image formats are available.

Finally – you can click on the “Gears” button on the main window to choose a folder on which to execute your batch processing:

Choose a folder and files on which to apply your actions

The program will then batch process your files and save them wherever you selected in your SAVE action.

An easy and well written tool for us Linux Photographers.  I hope you enjoy using it.

A Tip for Linux Beginners

I like Linux.   I enjoy using it.  I even like having a problem and solving it.  Unfortunately, I don’t get to use it as much as I would like.  I’m forced to use windows at work, and I have limited time at home.

Although I have used Linux for close to 10 years – I still consider myself a beginner.  I may have a general idea how the system works – and I’m very good at using google to help me fix problems and accomplish tasks – but I will often forget what I did within a couple weeks.

Some people ‘bookmark’ solutions when they find them.  I used to do that.  I had well over 100 bookmarks – often with obscure names – so I still had difficulty finding the right one.  I tried “managing” my bookmarks – but that takes a lot of time too.  You always have to worry that a page has been removed and you won’t be able to access the solution again.

The solution for me was a text file that I keep on my desktop.  It started when I was learning how to use ‘rsync’ to backup some folders to an external disk.  In fact, the file is still named “Mediashare_Backup” – even though I use it for much more than that.  As I learn a new trick, or command, I will put it into this file (with a little description.)  For example -when  I figure out the proper ffmpeg string to convert a video, or how to ssh to another computer, I will copy and paste for future reference.  After I’ve forgotten the specifics, my reference is just one click away.  A very simple solution.  Happy Computing!

KRename is a Linux Photographer’s Best Friend

Or – at least – a really great tool to use.

If you are anything more than a casual Linux-based photographer you know that Linux provides its own set of challenges when dealing with your pictures.

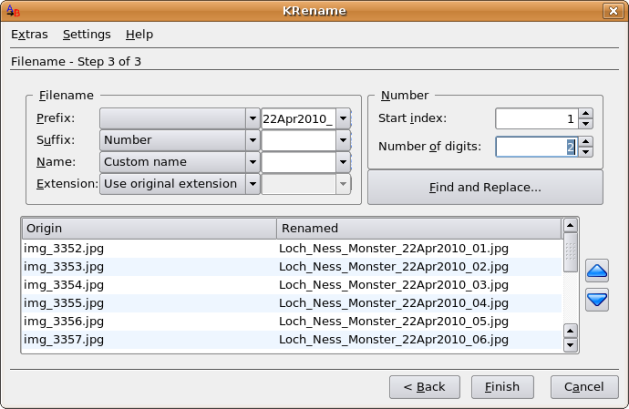
Although all photographers don’t do this, I like to rename my pictures as soon as I have downloaded them to my hard drive.  Although some people simply manage their pictures through keywords, metadata, or IPTC standards, I still prefer picture names that give me a little idea of what they contain.  Who wouldn’t prefer “Puppy_first_birthday_22Apr2010_001.jpg” to “DSC1097.jpg“?  Now I don’t need specialized photo software to know what I’m looking at.

If I were really good in Linux I would have written myself a nice script to rename the files from one version to another.  I’m not that good.  But I did find a tool that works great!  KRename.  I’ve attached a couple screenshots of the program.

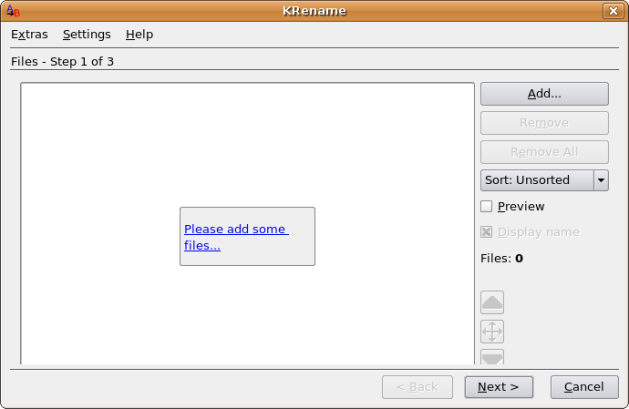
First, here is what you see when you start up the program – Just drag and drop:

KRename on opening

KRename on opening

There are several options for what you can do with your files:

What you can do with KRename

What you can do with KRename

Finally – you can figure out the new names for your files – including incrementing numbers!

Renaming your Files

Renaming your Files

I did a little looking, and KRename looks like it is in the Ubuntu, Debian, and Fedora repositories.  If you can’t find it, you can go to http://www.krename.net to get the latest version. I have probably renamed over 2000 files with this program (about 20 at a time) – and never had a problem.  I highly recommend it!

Goodluck with your pictures 🙂