Scanned Photos in Picasa – Use This Tool!

While Picasa is a wonderful tool – it does have one flaw.  It sorts pictures by the date in their exif header.  If you keep the date on the camera correct, this isn’t a problem.

However – I have two sets of pictures that give me problems.  I have been scanning my old 35mm film at home for a couple years in my spare time.  I have also sent away some APS film that I wanted to have scanned before it became totally obsolete.  When these pictures are scanned, the date in the exif header is the date that the film was scanned. (The scanner creates the exif header)

Even if I file them in folders for a particular date – I still have scanned photos from the 1980’s showing up in 2009 under picasa.

To fix this you have to modify the date in the exif header.  The best tool I have found to do this is jhead.  Luckily – jhead works on windows, mac, and linux.  Now to set the dates for a whole series of pictures in a particular directory I can just do this:

jhead -ds2000:12:25 * (set the exif dat to Christmas 2000)

You can even set the filestamp to the date in the exif header with

jhead -ft *

This may not seem like much – but it might be the only tool I’ve found that can do this.

If your image doesn’t have any exif data – you can even create the header:

jhead -mkexif *

Now these pictures will show up in the correct chronological order in Picasa – and finding the ones I want is much easier.  I suggest you check out the documentation page for all the options available.  But I have found this to be one of the critical tools in my Linux Photographer Toolbox.  And all you lucky PC/Mac users get to use it too 🙂

Is a UV filter a good idea for your lenses?

I was on the fence before.  I’m not anymore.  Over Memorial Day weekend we went to an amusement park. Although I have a camera backpack – I rarely use it.  It provides great protection but it is cumbersome.  I can’t carry anything else (water or snacks) in the same pack.  And it SCREAMS Photographer – when I am often just trying to enjoy myself.  So normally I just put my camera in a backpack and wrap it in a spare t-shirt.   I was taking pictures of one of those log rides and I looked at my lens to see if it was wet.  This is what I saw:

My UV Lens

Luckily this is not an expensive UV Filter – only about $20 if I remember correctly.  I prefer to have my in-expensive UV filter cracked, rather than my $750 Expensive Lens. Another note – this occurred with the lens cap on.  Here is a closer look:

Closer look at crack

I suppose someone could learn another lesson from this – use the camera bag.  But I not going to do that.  For now I am going to keep these nice cheap UV filters on all my lenses.

Using my Canon FS20 with Linux

Before I start – let me say that this is not a post about editing the video of the Canon FS20 in Linux.  I haven’s set up my machine to do that yet (I shuttle the video over to a Mac for editing right now).  This is just a simple explanation about how to get the video off the camcorder, on your computer, and uploaded to Youtube.  I’m doing this on Ubuntu 8.04 – I can’t vouch for other systems.

Canon FS20 Video Camera

1) Plug in the camcorder power supply (the camcorder will not just connect on just battery power.)

2) Plug in a USB cable connected to the computer and to the camcorder.

3) Turn the camcorder on.

4) Press the button on the bottom right of the screen (has a ‘movie camera’ and a ‘play symbol’)

5) Use the little toggle switch to select “PC/PRINTER

6) Press the toggle switch down to select it.

7) You should now have a folder named “CANON” on your screen.  Open it.  Select SD_Video folder, and then the PRG001 folder.

8.) In the folder you will find “.MOD“, “.MOI“, and “.PGI” files.  The “.MOD” files are our mpeg movies.  Copy these files to the Desktop so you can work with them.   Select one of those files and rename it (in my example) from “MOV001.MOD” to “newcuriousthoughts_example.mpg” (or whatever you want to name it – the important part is the ‘mpg’ extension)

9) Once you have the file off the camcorder, you can unmount the camcorder by right-clicking the “CANON” folder and choosing “un-mount“.  You can now disconnect the USB.

10)  Now you can play the file or upload it to Youtube…  almost.  Unfortunately – this is what it looks like when I upload it to youtube:

11)  To fix this “squished” look I figured out a ffmpeg string to convert it to an mp4 and maintain the aspect ratio.  For my video it would be:

ffmpeg -i newcuriousthoughts_example.mpg -aspect 16:9 -b 9600kb -r 29.97 -ab 256k newcuriousthoughts_corrected.mp4

Note:  I like this Reference for ffmpeg.  I think I chose these parameters to keep the size as close as possible.  For my example – the video size is 5.1 Meg – after conversion it is 5.4 Meg.  I’m sure you could tweak this if you like.  Sometimes I will add the “-deinterlace” option – which works pretty well.

Here is now the video looks after the conversion:

The video will look better than this on youtube.  WordPress just limits the size of my youtube object – that is why it looks shrunk.  Hopefully this will help some of you in the future!  Someday I’ll start editing these files – but I haven’t tried it yet.

VASRA – Virginia Championships Videos – 22 May 2010

NOTE: This blog is now inactive.

I have moved to the Nova-Rowing Blog

—————————————————————-

The races are done, the weather was very good, and we didn’t get rained on.  Below are the videos I took of the races.  Seeing all those great racers out there trying their hardest made me realize one thing.  I’m a terrible videographer!! I never did figure out a good strategy to get all the action.  If I moved away from a racer it was because I didn’t think their position would change by the finish. Sorry – but hopefully these are better than nothing 🙂

All the videos I have are posted – you can also look at the  NewCuriousThoughts youtube channel

The videos on Youtube will play at a higher resolution – wordpress seems to restric the size of the videos I embed in my posts.

Also – I haven’t screened these videos yet as I have been converting and uploading them all evening. If there is something ‘bad’ in them – I apologize and will try to fix it later. (Update – I got one phone call the whole day – in the middle of the men’s eight final – go figure…) Also – hopefully I got the races matched up correctly – if not – something else to fix…

The results are now posted at VASRA Results .

By the way – the entries for the VASRA Championship is here.

Race #1:  M 1x Final   (Men’s 1X Final)

Race #2:  M 2x Final (Men’s 2X Final)

Race #3: W 2x Final  (Women’s 2X Final)

Race #4: W Junior 8 Final  (Women’s Junior Eight Final)

Race #5:  M Junior 8 Final (Men’s Junior EIght Final)

Race #6: M 2nd 8 Final (Men’s Second Eight Final)

Race #7:  W 2nd 8 Final (Women’s Second Eight Final)

Race #8: M Junior 4 Final (Men’s Junior Four Final)

Race #9: W Junior 4 Final (Women’s Junior Four Final)

Race #10: M 2nd 4 Final (Men’s Second Four Final)

Race #11:  W 2nd 4 Final (Women’s Second Four Final)

Race #12: W 4x Final (Women’s Four X Final)

Race #13: M 4x Final (Men’s Four X Final)

Race #14: M Lt 4 Final (Men’s Lightweight Four Final)

Race #15: W Lt 4 Final (Women’s Lightweight Four Final)

Race #16: M Lt 8 Final (Men’s Lightweight Eight Final)

Race #17: W Lt 8 Final (Women’s Lightweight Eight Final)

Race #18: M 2x Final (Men’s Two X Final)

Race #19: M 1st 4 Final (Men’s First Four Final)

Race #20: W 1X Final (Women’s One X Final)

Race #21: M 1st 4 Petite (Men’s First Four Petite Final)

Race #22: Deleted

Race #23: W 1st 4 Petite (Women’s First Four Petite Final)

Race #24: W 1st 4 Final (Women’s First Four Final)

Race #25: W 1st 8 Petite (Women’s First Eight Petite)

Race #26: W 1st 8 Final (Women’s First Eight Final)

Race #27: M 1st 8 Petite (Men’s First Eight Petite)

Race #28: M 1st 8 Final (Men’s First Eight Final)

Teams Racing: Wakefield, Mathews, Western Albemarle, Great Bridge, Grassfield, Cox, Hickory, Hylton, Jeb Stuart, Woodbridge, Potomac, Woodson, O’Connell, Thomas Jefferson, Lake Braddock, Yorktown, Georgetown Visitation, West Springfield, Robinson, Garfield, TC Williams, Gloucester, Episcopal, James River, South County, Granby, Madison, Oakton, Langley, Forest Park, Jeb Stuart, McLean, Fairfax, St Albans, Washington Lee, Mt Vernon, National Cathedral, Madison, First Colonial, Page, Christchurch, Cape Henry

Phatch – Linux Photo Batch Resizing

In a previous post I mentioned KRename.  It really is my favorite tool for renaming photos once I get them onto my computer from the camera.  I use it the most. But occasionally I need to resize my photos, or I want to resave them to a lower resolution, or a more compressed jpeg.  I often do this when I want to email several photos to people or I want to resize them for this blog (and not use all my allocated memory.)

For these tasks I like to use Phatch. I have it in my Ubuntu 8.04 repository.  If it isn’t in yours you can find the download here for Linux (and Windows and Mac).  Phatch is a neat little tool written in Python that allows you to shrink your photos, apply text, or watermarks, round the edges of photos – then save them with a chosen name.  Like KRename – I’ve never had it destroy a set of my photos (always very important.)  I’ll admit I find the interface a little weird – but it tries it’s best to be intuitive – and I can usually work my way through without much trouble even if I haven’t used it for a couple months.

Here is a very simple example of what Phatch can do:

When you open the program you get the working window:

Phatch Opens with the Action List Window

You then click the “+” key to get a list of possible actions for your photos from which you can choose:

A List of Actions to choose from...

There are MANY more actions than this available. You can read about all of them in the Phatch Wiki.  I usually am simply resizing my photos.  Once you choose an action you are given a variety of options:

Each action has various options from which to choose.

Whatever actions you choose – you need to remember the make the last action the SAVE action.  Here is where I adjust the JPEG quality of my original photos.

Working with SAVE. A variety of image formats are available.

Finally – you can click on the “Gears” button on the main window to choose a folder on which to execute your batch processing:

Choose a folder and files on which to apply your actions

The program will then batch process your files and save them wherever you selected in your SAVE action.

An easy and well written tool for us Linux Photographers.  I hope you enjoy using it.

KRename is a Linux Photographer’s Best Friend

Or – at least – a really great tool to use.

If you are anything more than a casual Linux-based photographer you know that Linux provides its own set of challenges when dealing with your pictures.

Although all photographers don’t do this, I like to rename my pictures as soon as I have downloaded them to my hard drive.  Although some people simply manage their pictures through keywords, metadata, or IPTC standards, I still prefer picture names that give me a little idea of what they contain.  Who wouldn’t prefer “Puppy_first_birthday_22Apr2010_001.jpg” to “DSC1097.jpg“?  Now I don’t need specialized photo software to know what I’m looking at.

If I were really good in Linux I would have written myself a nice script to rename the files from one version to another.  I’m not that good.  But I did find a tool that works great!  KRename.  I’ve attached a couple screenshots of the program.

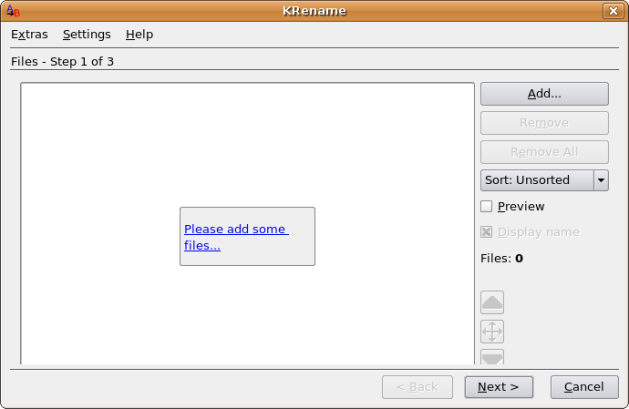
First, here is what you see when you start up the program – Just drag and drop:

KRename on opening

KRename on opening

There are several options for what you can do with your files:

What you can do with KRename

What you can do with KRename

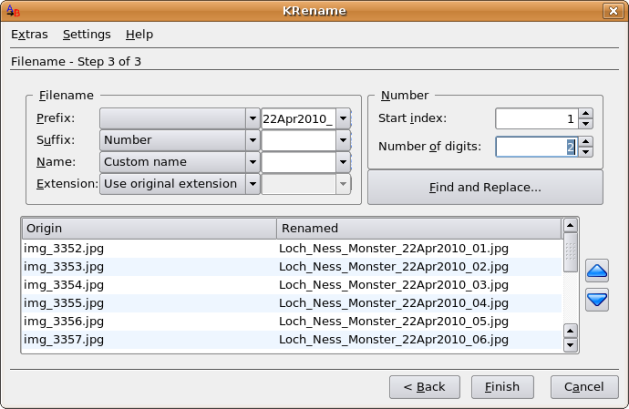
Finally – you can figure out the new names for your files – including incrementing numbers!

Renaming your Files

Renaming your Files

I did a little looking, and KRename looks like it is in the Ubuntu, Debian, and Fedora repositories.  If you can’t find it, you can go to http://www.krename.net to get the latest version. I have probably renamed over 2000 files with this program (about 20 at a time) – and never had a problem.  I highly recommend it!

Goodluck with your pictures 🙂